If you follow me online, you likely know I’m building a “micro datacenter” out at my farm. I sorta made that term up, but from a functionality standpoint, it sits somewhere between a homelab and space in a commercial datacenter. It has commercial grade fiber Internet with a block of static IPs, extended off-grid power (with future solar capability!), and highly-available virtualization system. In order to make all that work, I needed something more than the Unifi USG Pro I’d been using for years. So I decided to dust off my old pfSense-based Netgate SG-3100 router, to see if it would work after a disappointing experience years ago that forced me to shelf it.
Spoiler Alert: That problem appears to be solved.
Spoiler Alert the Second: That wasn’t a typo in the first paragraph. I own an SG-3100, but this review is of the SG-4100. Why? Well, first a tiny story:
My Breakup with pfSense
Without getting too far into the weeds, the reason I moved away from pfSense after YEARS of using it for just about every routing need, was Plex. Specifically, there was some weird bug or misconfiguration on my part which caused a remote Plex stream to buffer like crazy, regardless of bandwidth or latency. After months of trying to solve the issue (which seemed to be related to an established connection keeping-state) I abandoned pfSense. After talking with folks at Netgate, it sounds like it might have been a bug in FreeBSD itself. That seems to be fixed now, so pfSense gets a place at the table again.
I bought the SG-3100 with my own money, and had a rackmount SG-8860-1U that I also bought for use at my home office. Since I run Plex servers from both locations, I retired them both at the same time. Since I wanted to upgrade my “micro datacenter” back to pfSense, I went online to make sure one of my two devices was still supported. It turns out the larger and more powerful (and more expensive) rackmount unit was EOL (end of life). Apparently I could still update it, but it was no longer supported, and the reason appears to be due to the ATOM C2000 bug which caused many embedded devices to suddenly and catastrophically fail. The SG-3100 was EOS (end of sale) which meant it was still supported, but clearly on its way toward EOL as it was replaced by a newer model. I lamented a bit online, because I’d invested a lot of money in these devices several years back, and using either for my new install seemed unwise.
That’s when Netgate contacted me. They agreed to send me a new SG-4100 (which was the model replacing my SG-3100), in return for a review. And that made me a little nervous. I’ve reviewed a LOT of products over the years, and some companies are great about having zero expectations, and others are pretty full of themselves and get quite aggressive when you give their bad product a bad review. And honestly, I’m usually quite kind with my bad reviews, but I’ve still had unpleasant experiences. I made that clear, and Netgate insisted their review unit, which I was allowed to keep, was in return for an honest, unbiased review. So I accepted.
Spoiler Alert the Third: I understand why they were OK with an honest review. The SG-4100 is a really great unit. Five stars. Would recommend. (Do recommend) But you’re here for details:
The Actual Review
This will be the more in-depth review, but if you prefer to watch a video version, I have a video review on YouTube:
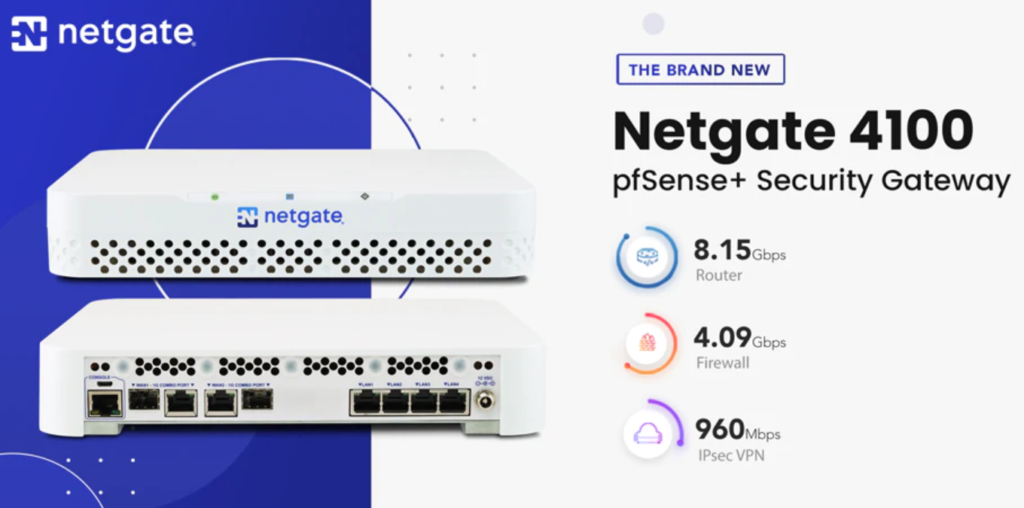
If you’ve read/watched my reviews in the past, you know I don’t like to regurgitate specs about a product. You can look those things up if you want. But for a router, some of the specs are really vital to understand. Namely, how well can it actually route packets. Full gigabit connections are becoming commonplace(ish) with the advent of fiber-to-the-home, and very few off-the-shelf home routers can actually handle that much traffic. Like, very very few.
Finding reliable specifications for routing throughput is often a challenge, because companies will usually give you the absolute best (or even worse, “theoretical”) bandwidth a router can handle. But those speeds are never what you get in real world situations. In my experience, you basically have to buy WAY more “promised throughput” than you’ll need, because the listed numbers are nuanced and lab-only tested. To Netgate’s credit, they give you the good, the bad, and the ugly on all of their various models. If you look at that buying guide, they provide the “best” speeds, but also more practical speeds you can actually expect. (They explain in super-nerdy detail the difference here)
And yes. The SG-4100 will totally handle my symmetric gigabit fiber connection without any problem. The SG-3100 will also handle it, which is nice to know. That means I have a fully functional backup router now, in case something goes sideways with the 4100.
What About VPN Speeds Though?!?
If you look at the guide linked above, you’ll see that indeed running OpenVPN on the router, with IMIX (the “realistic” type traffic), it’s limited to just over 300mbit. If you are planning to connect site-to-site VPN to push all your traffic up to a corporate HQ or something, this SG-4100 will not take full advantage of your gigabit connection.
BUT.
If that is your need, you can handle it several ways. One, you could get a bigger model. You will pay significantly more to route gigabit speed encrypted OpenVPN traffic — but it’s possible with 1537 model, for instance. That is not what I would do, however. In fact, I almost never run VPN services from my router devices, because VPN encryption is a lot of heavy lifting with regard to CPU, and I’d rather use a traditional server for that. When I need to run VPN, I usually do it from an internal server, and just port forward the traffic through my router. The SG-4100 will easily route VPN traffic to an internal VPN server, because it’s just routing packets at that point. Let your fancy pants rackmount server host VPN, and let your router route. That’s just my personal preference, but at the very least I recommend weighing the cost/maintenance advantage between using a server and buying a more robust router.
Cool. It Will Do Gigabit. Is That It?
No. pfSense does basically everything but load the dishwasher for you after dinner. And that’s a challenge for me, because I really like to have my routers route, and little else. But pfSense (and so Netgate appliances) can do so much stuff! My absolute requirements for a router is that it can:
- Manage all my public IPs, even if I have more than one
- Handle NAT and Port Forwarding for individual external IPs
- Allow firewall rules that can block by port/ip/etc.
This isn’t a review of pfSense, but since the SG-4100 is running pfSense (actually pfSense+, which is a fork, and a longer story, but as of today very similar to pfSense) — it can handle everything from DHCP/DNS, to intrusion detection, to various VPN technologies (including Wireguard), to 3rd party packages providing every network-related service you can imagine. I generally don’t even run DHCP on my routers, but if you like your routers to be all-in-one network service boxes, pfSense won’t disappoint. And since I don’t need site-to-site VPN, and will likely only need remote connection for administration — I might actually run VPN on the unit, and break my unwritten rule!
The Hardware
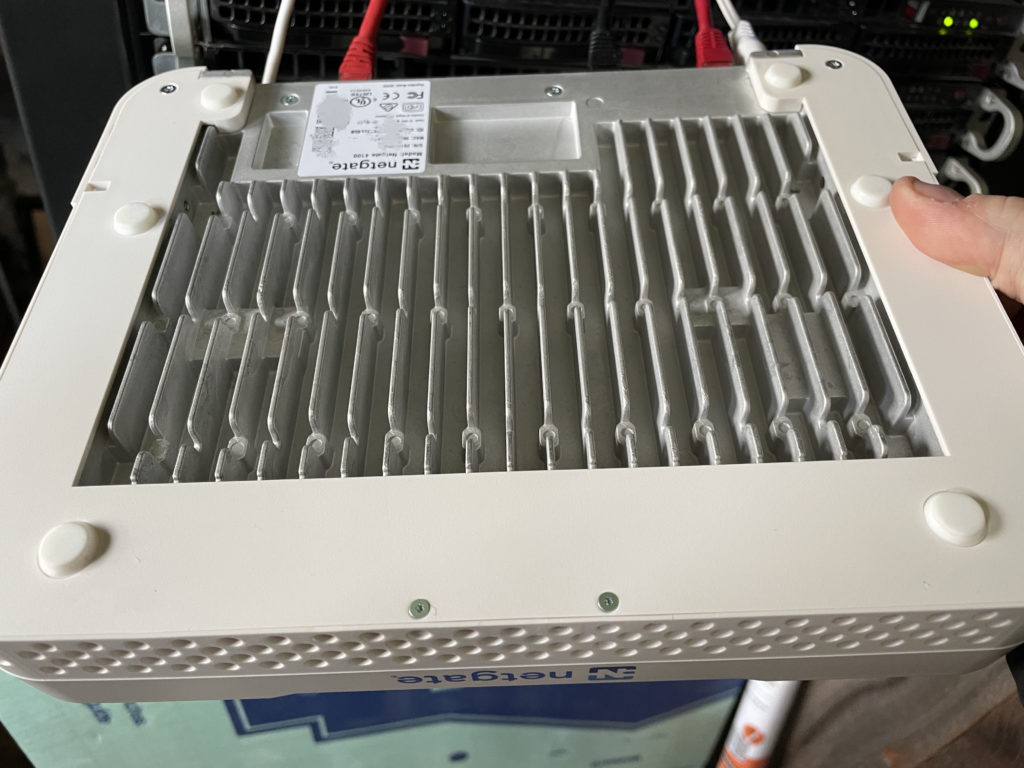
I know I said I don’t generally talk about hardware specs in reviews, but in this case, it’s hard not to. There are two standout design choices that really impressed me. The first is the actual design of the appliance itself. The shell is plastic, matching the current white color of the main SG line. But the base is one solid aluminum heatsink. There aren’t any fans, but the entire bottom has cooling fins molded into the aluminum, making for a really efficient and effective passive cooling system. With a front-to-back flow design, if the appliance is put into a rack (more on that later), air flow should be ideal for keeping it cool. It was a surprisingly robust cooling setup for a desktop router.
Next, most routers have a WAN port, and a few LAN ports in a shared switch configuration. This is nice for home users that don’t have need for a larger switch and just plug their few devices into the router’s LAN switch, but for me, I just need a port to uplink my rackmount switches into. The SG-4100 surprised me with its LAN port offering. Because calling them “LAN Ports” is a bit misleading. They’re much more.
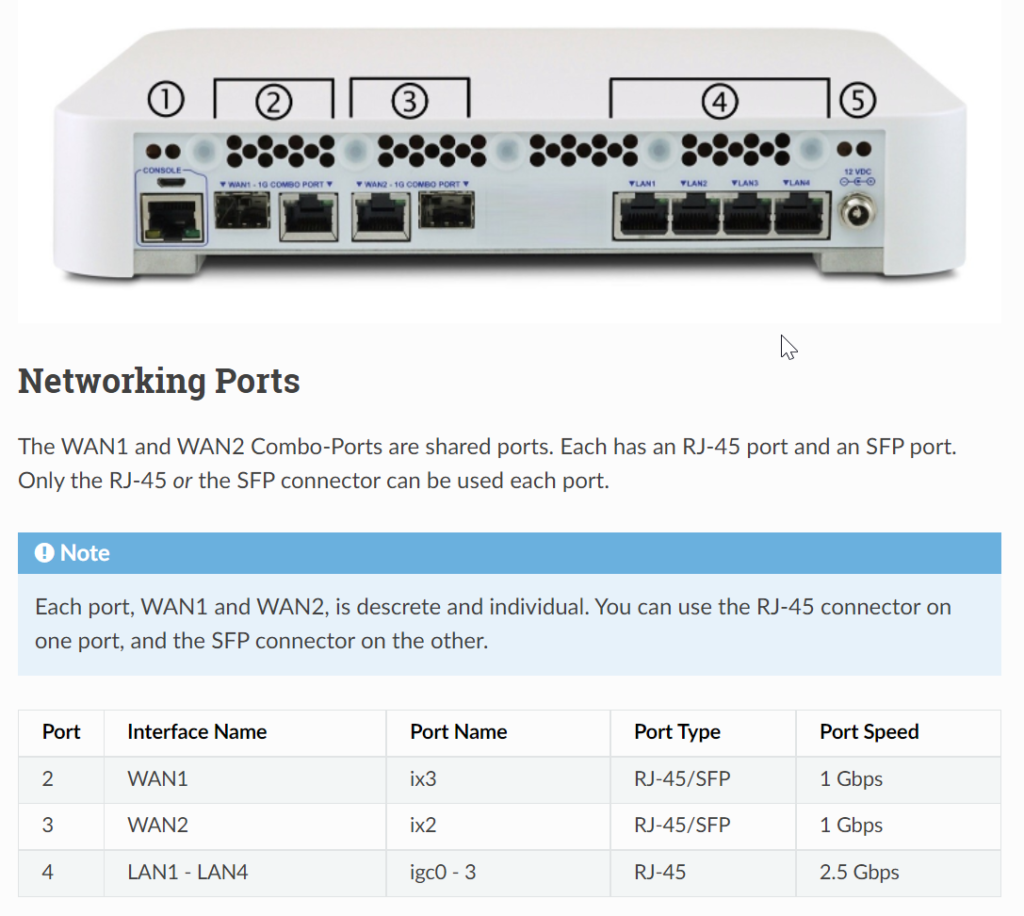
The SG-4100 has (2) WAN ports, each with either an RJ45 Ethernet jack, or an SFP port. Each port can be connected with one or the other, but not both. If you’re familiar with pfSense, however, you know that while the ports are labeled as WAN1 and WAN2, you can do pretty much whatever you want with the ports. If you want your WAN2 port to be a DMZ, it’s just a matter of configuring that in the web GUI. If you want dual WAN with failover? Again, just configure it via the web GUI. Want to load balance? Same deal.
The part that surprised me was that each of the 2.5Gigabit LAN ports are independent devices. Like I mentioned earlier, most routers have a handful of LAN ports, but they’re just a single logical device with switch ports. Not only are these LAN ports 2.5Gigabit, but they are addressable separately in the web GUI. This means you can have multiple DMZs, or you can route specific traffic to specific LAN ports, or in my case, you can bridge a LAN port to the WAN1 port, and have a second router plugged into that LAN port and take an IP from the fiber itself.
Let me explain. At my farm (where the “micro datacenter” is being built), I have an existing network using Unifi hardware. I’ll probably eventually get rid of that USG router, and integrate my Unifi switches into one LAN. But at first, I’m keeping my old network active, and using one of the IP addresses in my public block. Rather than putting a switch between my fiber handoff and my routers, I can plug directly into my SG-4100, and then have my Unifi router bridged to the Netgate’s WAN port, getting a direct public IP from my ISP. Yes, that’s a very specific, and very niche setup — but it’s because of the independent LAN interfaces that I can do it!
The SG-4100 basically has (6) fully usable network interfaces which can be manipulated in countless ways thanks to the flexibility of pfSense. That’s one thing the 4100 has over my 3100. It only had switched ports on a single LAN interface. This is much cooler, in a very nerdy way.
So You’re a Netgate-Loving Shill, Eh?
Wow, that was harsh. The guy making these section headings is a jerk. Seriously though, once the weird network-state issue was out of the picture, it was inevitable that I’d be a fan of pfSense and Netgate appliances again. I ran pfSense on server hardware for over a decade in a huge school district, and never once had a problem with it. Switching to an appliance for my personal use was a no-brainer, because they use so much less energy, and “just work” out of the box. One of those advantages is in the console. And the console on the SG-4100 wasn’t something I planned to test, but I sorta had to.
When I first set the unit up, I changed the default password, because I’m a grown up network professional who would never leave the default password on anything. I’m also a silly, scatter-brained goofball, whose ADHD medicine was long since worn off at the time, and I forgot to save that password to my password manager. (I probably assumed I’d never forget the complex password, because I’m an idiot…) Anyway, after that initial setup of the WAN/LAN bridge so I could keep my existing network running while doing the new network setup, I had lots of Life™ happen. We had to attend a funeral out of state, my wife (a drama teacher) had “Play Week”, which mean I was building sets and props from morning to night, and countless other work-related things kept me from completing the setup.
And I forgot the password.
The SG-4100 does this really smart (and super annoying in the moment) thing where if you get the password wrong several times, it locks you out for a while. After over an hour of trying to remember what password I used, I decided it was time to do a factory reset so I could start over. That sucked because setting up the network bridge took a while. Anyway, I put my laptop up on the rack, and plugged the (included) micro-usb cable from the router into my laptop’s USB port. The Linux kernel on my laptop immediately recognized the console port, and a simple:
sudo screen /dev/ttypUSB0 115200Connected me to the console. And guess what one of the options in the console was? Reset the web interface’s password! I didn’t have to factory reset anything, and with a quick keystroke via the console, I was able to reset the password to the default of “pfsense”, and log right in. (Yes, I immediately changed the password to something complex, and this time saved it to my password manager!)
Seriously, that was the easiest, most useful device console experience I’ve ever had. That alone makes the decision to use an appliance vs a full blown server much more attractive for me.
So What Do You Dislike About It?
Ahh, you’ve read my reviews before. I always ALWAYS make sure to highlight weaknesses along with strengths. Sometimes this is the part of the review that makes companies angry, but in this case, there’s not a whole lot I found frustrating. If anything they are nitpicks, and my biggest issue was addressed a couple days ago. So Netgate stole most of my thunder. [shakes fist in mock anger]
My biggest frustration is that there was no great way to mount the router in a server rack. This unit is above and beyond what most home users would need, so it’s really more likely to live in a rack of some sort. And while the unit is thankfully 1U tall, it was clearly designed for sitting on something. It even has little rubber feet that stick on the bottom. I didn’t measure, but it’s probably about 11″ wide. I just set it on top of one of my rackmount switches, and it works fine. (I actually left the rubber feet stuck on, and it was a snug fit, but that ended up being a moot point…)
Netgate sent me a brand new rackmount kit, which fits the SG-4100 and the SG-6100. It’s not available for purchase yet, so I don’t know the price — but this thing is designed VERY well for a rackmount adapter. Usually, when a device like this has a rackmount kit, it consists of a couple L-shaped ears that screw to the side of the unit and allow you to mount it on a rack. But this is a solid aluminum enclosure, which allows for even more heat dissipation, and USB extensions to bring the side-mounted USB ports to the front of the rack.
When I first tried to install the router into the rackmount adapter, I was confused. I assumed it would face front like in desktop mode, and just securely mount to the rack. But this is designed to flip the unit backward, so ALL the ports are on the front of the rack, like an actual rackmount router. The only downside is the power cord is awkwardly on the front panel, and the 3 activity lights are no longer visible because they now face the back of the rack. But honestly, it’s a fair tradeoff for what is otherwise a full conversion to a rackmount router.
My other “complaints” are pretty minor. I very much wish there were redundant power connectors like my MikroTik 12-Port 10G Switch. External “wall wart” transformers sometimes blink out, so a second connection would give me a little peace of mind. But had my MikroTik switch not included the feature of dual wall-warts, it probably wouldn’t even have occurred to me. So maybe in future revisions it’s something Netgate might consider, if the cost isn’t excessive.
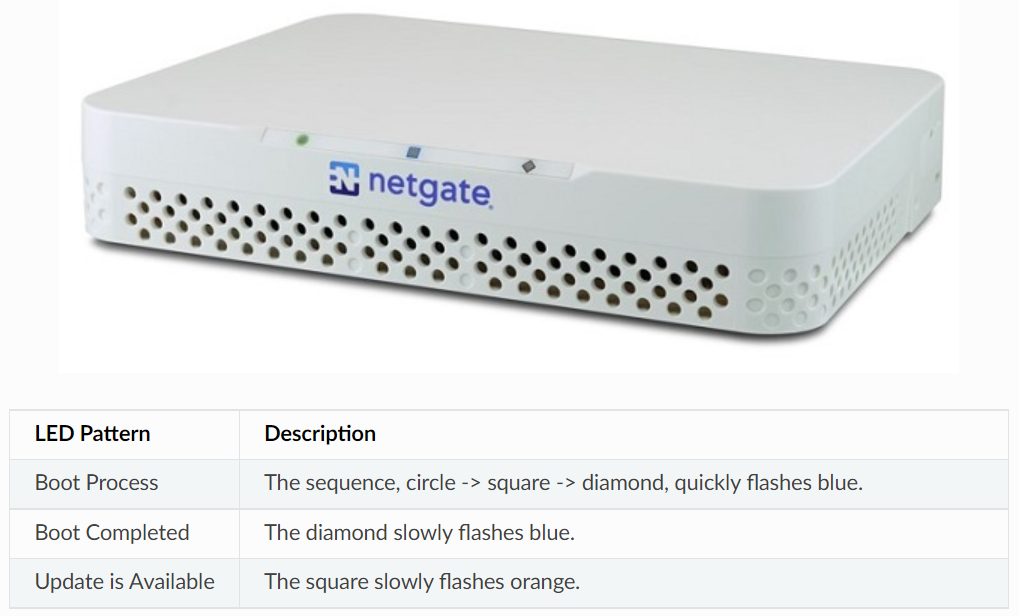
The last nit-pick has to do with those activity lights. They are not labeled. There is a circle, a square, and a diamond. The LEDs can blink and glow different colors (I think), but they mean absolutely nothing unless you look up what they indicate.
I guess it’s cool to have different shape lights. Aesthetically they fit the clean white design well. But without any labels or a sticker explaining what they mean? I find the lights close to useless unless something is wrong and you look up what they are trying to tell you. With the rack mount kit, they’re sort of a moot point now, because they face the back and I can’t see them at all. But since they do actually serve a purpose, it would be nice if that purpose were clear. (Oh, and with the ability to swappy-do-rack-reverse them, maybe the next model could have mirrored lights in the back. With labels. lol)
My Summary?
The Netgate SG-4100 is a very powerful, extremely well designed, and highly customizable router that will serve anyone needing full gigabit routing, and the software capability of pfSense. At $599, it’s not something every home user will need or even want, but for an office environment or a home user who understands what they’re buying — it’s worth the price. I bought the SG-3100 and SG-8860-1U with my own money, and they were comparably priced for their power/features.
If you are a home user who wants to browse the web and stream Netflix? The SG-4100 is overkill. If you still want the flexibility of pfSense, you might look at their buyer’s guide linked above to find a price point that fits your needs. And if an off-the-shelf wireless router is all you need, I don’t recommend upgrading just for fun. Netgate routers are fun, but only for a very specific sort of Nerdling. 🙂
My Rating: 5.0 out of 5.0 stars